|
"Obrigado Marja's por
permitir traduzir seus tutoriais em Português"
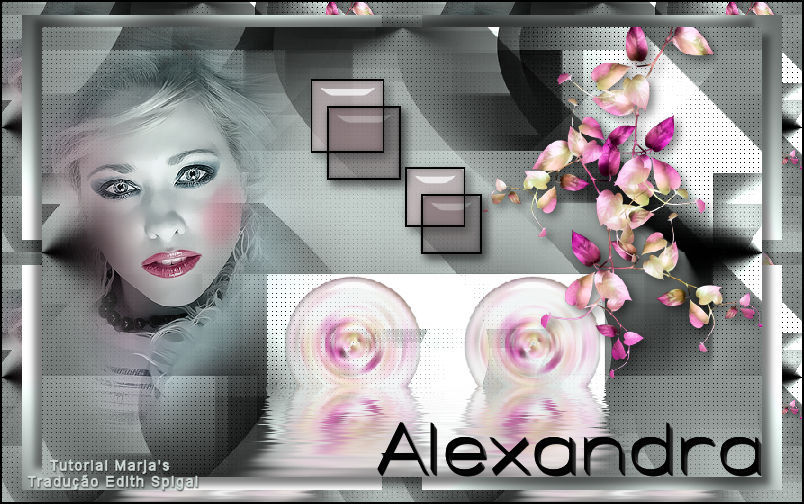
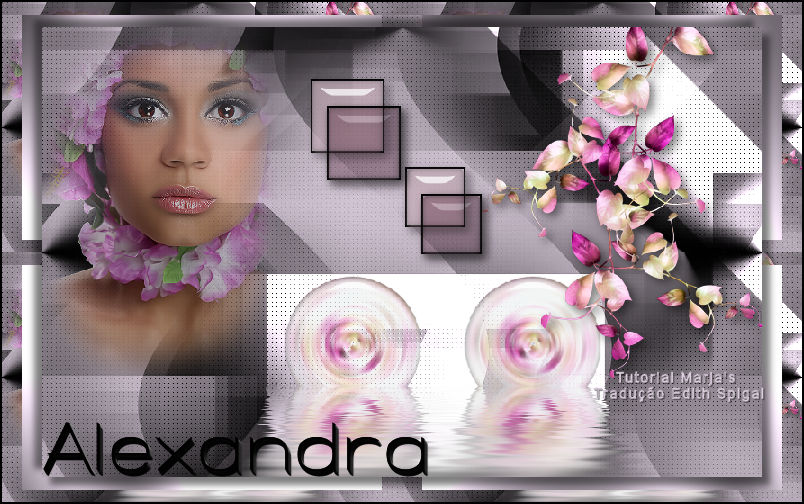
**ALEXANDRA**
MATERIAL AQUI
Tube(s)
0a0fe1
017d1f7
Alexandra deco 1
Tekst Alexandra
Filter(s)
Unlimited 2.0
Filter Factor Gallery H – GridMin.. * ( * importar para
Filter Unlimited 2.0 )
Flaming Pear – flood
Alien Skin Eye Candy 5 impact – glass
Graphic Plus – cross shadow
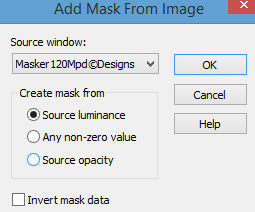
Mask
Masker120mpd©designs
Selecões(s)
Alexandra sel 1 mpd©
Alexandra sel 2 mpd©
Alexandra sel 3 mpd©
Preset
Les 323 Alexandra mpd©designs
(Faça
um duplo clique no present ele instalará
automaticamente)
Esquema de
cores
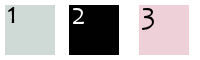
Cor-1
#cfdad6 / Cor-2 #010101 / Cor-3 #eed0d8
1- Abra uma nova
imagem de 800x 500 px.
2- Preencha com a Cor 2
3- Layers > New Raster Layer > preencha com a Cor 2
4- Layers > New Raster Layer > preencha com a Cor 1
Aplique a Mask 120Mpd Designs > Merge Group
5- Layers > Merge All
6- Selections/Load/Save Selection/Load Selection from
disk
Load Selection "Alexandra_salt 1"
7- Selections/Promote Selection to Layer > Select None
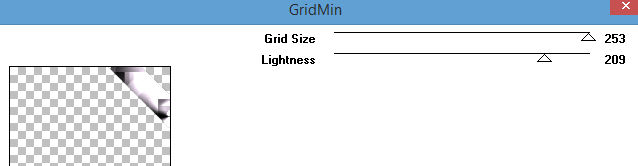
8- Plugin Factory Gallery H > GridMin (Default)
9- Ative a Layer inferior:
Selections/Load/Save Selection/Load Selection from disk
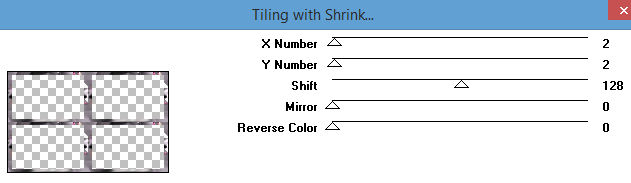
Load Selection "Alexandra_salt 2
10-Selections/Promote Selection to Layer > Select None
11- Layers > Arrange > Move Up
12- Plugin Factory Gallery H > GridMin > Default
(mesma configuração do item 8)
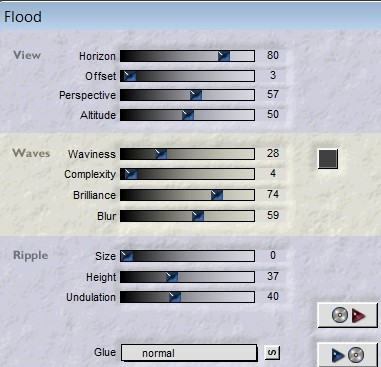
13- Plugin Flaming Pear > Flood
14- Copie e cole como nova layer o tube de "Alexandra
Deco 1"
15- Image > Resize 85%
16- Effects > Image Effects> Offset > (-55)/(-103)
Custom e Transparent Marcados
17- Layers > Duplicate
18- Effects > Image Effects> Offset > (200)/(0) Custom e
Transparent Marcados
19- Layers > Merge Down
20- Plugin Flaming Pear > Flood (mesma configuração do
item 13)
21- Copie e cole como nova layer o tube "0a0fe1"
22- Posicionar como resultado final
23- Adjust > Sharpness > Sharpen
24- Copie e cole como nova layer o tube "017d1f7"
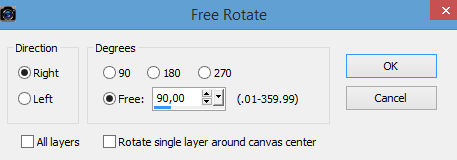
25- Image > Free Rotate 90,00
26- Effects > Image Effects> Offset > (245)/(60) Custom
e Transparent Marcados
27- Effects > 3D Effects > Drop Shadow > 5/5/50/15 -
Black
28- Selections/Load/Save Selection/Load Selection from
disk
Load Selection "Alexandra_salt 3
29- Layers > New Raster Layer > Preencher com a Cor 2
30- Selections > Modify > Contract > 2 px > Delete no
teclado.
31- Layers > New Raster Layer
32- Com a ferramenta Flood Fill com opacity 50
preencha a seleção com a cor 1
Select None.
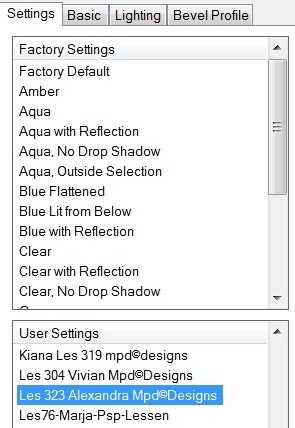
33- Plugin Alien Skin Eye Candy 5; Impact > Glass >
Present "The 323 Alexandra Mpd"
Select None
34- Layers > Merge Down
35- Ative o top layer > Effects > 3D Effects > Drop
Shadow > 5/5/50/15 Black
36- Layers > Duplicate
37- Effects > Image Effects> Offset > (18)/(-30) Custom
e Transparent Marcados
38- Layers > Blend Mode > "Multiply"
39- Layers > Merge All > Edit > Copy
40- Layers > Promote Background layer
41- Image > Resize 90% > All layers desmarcado
42- Com a Ferramenta Magic Wand . Tolerance 0 >
selecione a parte transparente
43- Layers > New Raster Layer > Preencha com a cor 1 >
opacity 100
44- Layers > New Raster Layer > Edit > Paste Into
Selection (imagem na memória > Item 40)
45- Layers > Merge Down
46- Plugin Muras Seamless > Tiling with Shrink
47- Selection > Invert > Effects > 3D Effects > Drop
Shadow > 8/8/50/10 Black
Repetir em negativo > (-8) - (-8)
48- Select None
49- Layers > New Raster Layer > Preencha com a cor 1
50- Layers > Arrange > Send to Bottom
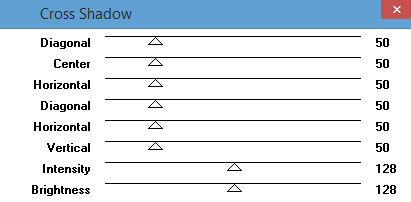
51- Plugin Graphic Plus > Cross Shandow > Default
52- Ative Top the Layer > Copie e cole "Tekst Alexandra"
posicione ao seu gosto.
53- Image > Add
Borders 2 px na cor 2
54- Assine seu
trabalho com sua marca D'Água.
55- Layers > Merge All
56- Salve em JPG.
Créditos:
Tube: Guismo
Envie suas versões para Marja que terá imenso prazer em
apreciar.
marjapspgroep@gmail.com
Tutorial de Marja traduzido em Português por Edith
Spigai.
São Paulo_Brasil - 20/09/2016


|